With the advent of the many affordable HD helmet camera options on the market (especially the GoPro), the number of point of view (POV) mountain bike videos on the internet has exploded! To bebrutallyhonest, the vast majority of the POV videos uploaded every day aren’t worth the time that it takes to watch them.
There are 2 main reasons for this poor video quality, despite the access to excellent equipment:
1) The camera angle never changes, many shots are shaky, and/or the only perspective used is boring.
2) Poor editing.
In the first half of this two part series, I will analyze a number of popular camera mounting options for mountain biking. Hopefully this will help you add a little extra zest to your next trail video.
[see_also id=”195610″][/see_also]
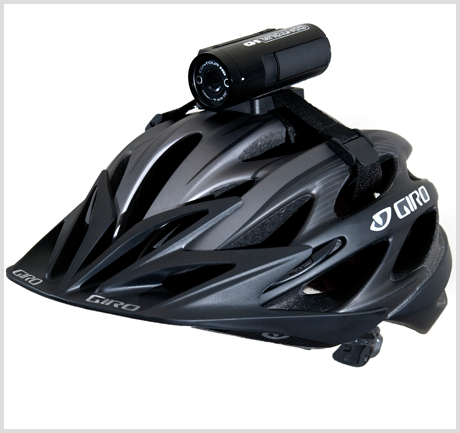
Helmet: Top, Facing Forward
Photo Credit: Contour.com
The default camera mounting option for most people seems to be on the top of the helmet, facing forward. This is expected, as these types of point of view cameras are commonlyreferredto collectively as “helmet cams.”
Unfortunately, this perspective can sometimes be the absolute worst choice for an interesting video. If you are riding solo, this shot tends to create a flag pole-type perspective with nothing in the frame to add depth to the picture. It’s almost impossible to tell how steep the trail actually is or how large the obstacles are as there is nothing else to compare them to. Also, the bike is not in the picture at all, so the viewer has no idea how exactly the rider is handling his bike.
However, if you are filming a chase scene with another rider in front of you, this angle does an excellent job of capturing what the other rider is doing on the trail. This is the only instance when I’d personally recommend this mount.
Helmet: Top, Facing Backward
Again, this angle is really only useful if you are shooting a chase scene. Obviously, it would capture the performance of the rider behind you.
Full FaceHelmet: Side Mount, Facing Forward
This is a pretty popular mount with gravity riders wearing full face helmets. The angle inevitably captures part of the helmet in the picture, and that little section of helmet is usually enough to lend a little bit of perspective to the image. Also, you can usually see the bike a little bit in the bottom of the frame, which is especially cool on jump lines.
Here’s an actual video to give you an idea of what this perspective looks like:
Handle Bars
Photo Credit: GoPro.com
After the forward helmet mount, this is probably the second most common mounting option… unfortunately. Because of the fact that the camera is mounted directly to the bars, it is constantly being jolted and shaken by the smallest bumps in the trail. When I watch videos shot from this perspective I can rarely make out what is going on, and most of the time my head starts hurting and I turn it off. It’s also impossible to see how the rider is working the bike.
The one thing that a bar mount does well is provide a good view of the trail surface, if it is relatively smooth.
Seat Post: Rear View
Photo Credit:GoPro.com
While at first glance you might think that the camera would suffer a lot of shaking mounted in this position, the truth is that this is actually a very stable mount, especially on a full suspension bike. This is a very unique perspective that I find is a lot of fun to watch. When you are riding a bike, you never get to see the trail disappearing behind your tires. But with your camera mounted like this, you can when you get home to your computer!
Also, the rear wheel provides a focal point for viewers to keep things interesting and to provide a little bit of depth to the picture. I also find it fun to watch how the suspension responds to changes in the terrain.
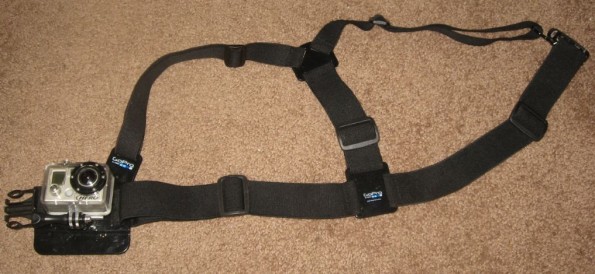
Chest Mount
When I’m riding solo, the chest mount is hands-down my favorite choice! Mounting the camera on your chest avoids the flag pole effect by providing close-up objects in the frame (arms and handlebars) that create perspective.
But the number one reason I enjoy this perspective so much is that the viewer can see exactly what the rider is doing, and how he manipulates the bike. Everything from shifting to braking to steering is visible to the viewer, making for a much more interesting video, especially if there are no other riders present.
One word of caution: make sure that your camera is aimed high enough to catch the trail out in front, because we don’t want to be staring at the top tube of your bike the entire time!
Get Creative
From ground placements for ride-by shots to having a camera spin around your head, your creativity is really the only limit when it comes to creating a unique perspective for your next trail video!
Coming Up
In the next installment, I’ll cover a few tips to help you edit your videos so they don’t end up in the expansive vault of neglected YouTube videos.
[see_also id=”12512″][/see_also]
Based on the videos that you’ve watched or created, what is your favorite video camera mounting option?


23 Comments
Jun 2, 2011
@muttonmark, those are some cool shots, although I think I’m with your friends on the last one!
@hazard, well said! They ARE just for playing around and having fun with, but I do think that most people out there need to put a little more time into their vids to actually make them worth watching… even if they’re just for fun.
@trailsnet, like I mentioned above, I’m not really a big fan of the handlebar mount. I think it is very shaky, and doesn’t offer a very good perspective.
@Ridingpastor, having multiple cams would be awesome! But I don’t have the $$ for that… And yes, one of my friends edits them in iMovie.
@FunkyJ, no problem, I’m glad to be of service! You’ll dig the chest mount. Be sure to post some videos up on the forums of some of your Australian singletrack, I’d love to see it!
Oct 3, 2015
Mountain Biking Video Tips & Tricks
https://www.facebook.com/groups/422558254606462/
May 31, 2011
Can you edit the footage in iMovie on a Mac?
I just don't think that I ride enough cool stuff to warrant a camera.
May 27, 2011
One "creative" mounting set-up I've experimented with is the steering tube facing backward mount. It's good for watching your rear shock (if you have one) but otherwise you just see your legs pumping up and down (useful for riders in training?). Oh well, I'll keep trying...
My biggest problem seems to be shaky videos no matter where I mount the camera (though mine doesn't work with a chest mount which may be the answer). I've seen a little improvement when I'm on a FS bike but on my hardtail the video shake is brutal.
While POV cameras are lightweight and don't get in the way of the ride (just hit record and go!) they really won't ever produce anything close to the pro movies you see these days. Sure, those movies typically splice in a little helmet cam footage but they're mostly shooting from fixed camera positions or even using booms and zip lines. And with fixed cameras the riders have to session the cool parts of the trail dozens of times to get different shots and perspectives.
With that in mind I think multiple POV cameras on the same ride could make a cool video using some creative editing. Speaking of editing, looking forward to Part 2!
Jun 2, 2011
Nov 6, 2015
https://youtu.be/4rkiTgDXGUo
and a second longer one using a chest mount.
https://youtu.be/qVwFM4uI7Rs
These are the first two videos I ever made, watch them in HD its better. I will have more coming, hopefully better edits, I look forward to part two!
Jul 8, 2011
May 29, 2011
Some of the mounts that I have used has been the Chest Mount, which is a good forward shot, but this too can get boring after a while. Some of my favorites so far have been on my down tube, looking forward just over my fork stanchions. It is steady, and it gives you my front tire in the frame for context, plus I can flip the camera around and shoot it in the air to see what I am doing while riding.
http://www.youtube.com/watch?v=tPy4tvfb4d8
Another new favorite is actually putting the gopro right on my fork itself. Thus far, this maybe the most stable mount I have, as the bike movement is absorbed within the tube and not the tube itself.
http://www.youtube.com/watch?v=WEi3ID26VKY
(This last video also has the rear seatpost view edited in, which I admit, I may have tried to edit a little too much with the different views. But hey, I'm not in hollywood, and even experimenting with the editing is half the fun)
The strangest view that I have done thus far, is the seatpost/forward view. It gives a pretty good shot over my stem, and you can see exactly what the rider is doing during the duration. My friends aren't real keen on the angle, as they said they were afraid of seeing "brain" if you know what I mean.
http://www.youtube.com/watch?v=Hc2u6HA7UMY
Overall, these cameras can be tons of fun. I plan on mounting it on my boat, kayak, Ski's, etc. Now I just need to find a good quality HD video editing software.
Apr 19, 2013
Apr 19, 2013
May 16, 2013
Apr 19, 2012
http://www.youtube.com/watch?v=HVvc10Tp0W8
May 29, 2011
That said, the GoPro HD can produce amazing quality footage - I wold admit that straight out of the camera, the GoPro is a bit soft and pale on the color, but if run through a decent editor its good enough for tv commercials. I'm sure the HD versions of Contour and other brands can do just as well.
My favorite angle for a solo ride is the chest mount - but I think if you're doing to try to produce an interesting clip of your ride, it's best to change it up and get multiple points of view - on angle for up to 3 minutes or more gets boring, imo.
Cool article, look forward to the second installment!
May 27, 2011
May 27, 2011
I used to mount mine to the headtube, but my new fork has a remote and the cable is in the way. This last weekend I helmet mounted and then followed my friends on the trail in order to capture some actual riding, not just trail...
http://contour.com/stories/buffalo-creek-5212011
One of the coolest videos I have ever seen was with the camera mounted on the downtube, looking through a dual crown downhill fork. Unfortunately the website is now gone, and even though I have a copy, I'm not sure if I can upload it due to copyright issues...
Jun 2, 2011
Is it on this same topic?
Oh, and thanks! :)
May 27, 2011
Like I said, this is one of the coolest POV vids I have seen!
http://vimeo.com/24330361
May 27, 2011
@bikerpanda, Crashes make the best videos!
@maddslacker, chest mount is definitely a big plus!
@eastwood, I'll still answer to Goo ;)
May 30, 2011
Since I ride trails all day long, a helmet-mounted camera would be kind of hard on my neck, so I'm still looking for a sturdy handle-bar mount.
May 31, 2011
Cheers from Australia
FJ
Mar 24, 2016
Jun 3, 2011
May 27, 2011
I also want one so my g/f can watch clips of the places I ride so she can decide whether or not any specific trail is out of her skill level.