Now here’s a scoop for all of you tech heads: Formula Brake Company was cool enough to send me a set of 2011 Formula R1 brakes for a review. I was actually expecting to get the the 2010 model so when these babies arrived I was stoked! The R1 is basically the pinnacle of the accumulated technology behind Formula which means these brakes are up there in cost but they’re dripping with superior modulation in a super strong, lightweight package. To me these brakes may well be worth their weight in gold.
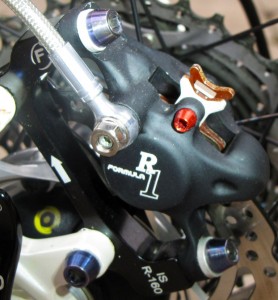
 The first thing you’ll notice about the R1 brakes is the forged and compact master cylinder (similar to Formula’s the ONE). The master cylinder (MC) takes up very little bar space and is radially constructed. Featuring a convenient flip-flop design, the R1 allows you to bleed the brakes on either side (dual ports) while the split clap allows you to install and remove the brake without disturbing other components (nothing drives me crazier than having to remove unrelated parts unnecessarily). Inside the MC is a high capacity reservoir that surrounds the piston.
The R1 master cylinder body is forged and then machined for maximum strength and minimum mass. Speaking of mass, you can get these brakes down to 263 grams. This is very light indeed for a brake that can be used safely by AM riders (Enduro) who want to keep their rigs in lightweight climbing condition.
The 2011 R1 model adds reach adjustment as well as pad contact point adjustments. The reach adjust (red knob) on the lever makes it easy to adjust how far out you want the levers, with plenty of room for adjustment. The contact point adjuster, which is radially mounted before the brake line, adjusts the volume in the line to compensate for pad wear and engagement points. Reach adjust is retrofit-able to 2010 models.
The bright red bits are all-aluminum fasteners to further reduce weight on the R1 brakes and torx heads on all the bolts reduces the risk of stripping the bolt heads. With the R1 it’s important that you follow the installation instructions to the letter and torque all the bolts down to stated values.
The R1 caliper hasn’t changed this year (probably because it’s hard to improve on perfection) and features the same forging process as the master cylinder. The upshot: a compact, lightweight, and stiff structure. What is hidden from view is the 22mm pistons and larger-than-expected brake fluid capacity behind the patented cap design. All of this increases the fluid capacity (reducing the chances of boil over) and reduces the physical size of the caliper (as well as weight).
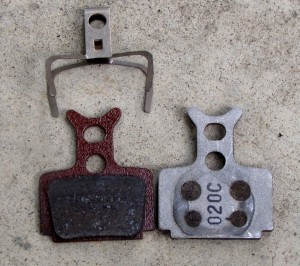
 The calipers are post mount in design and can handle rotors up to 220mm. However, keep in mind these are not DH brakes (those would be the ONE or the ONE FR). Earlier I mentioned how I dislike removing parts for no good reason and with Formula’s top load design, removing pads and springs can be accomplished without disturbing caliper alignment (see image right).
The stock R1 brake pads sport organic material backing on aluminum to further reduce weight but you can get the sintered pads on steel backing plates if you want a more aggressive set-up.
Installing the R1 brakes on my OPUS Stahk was a piece of cake. Following Formula’s instructions and recommendations it took all of about 30 minutes to get both front and rear brakes installed. I’m sorta particular so I shortened the hoses a bit and then re-bled the brakes (15 minutes per wheel). In the package you get extra fittings to get the job done without having to hit up your LBS for parts. Remember to torque everything down properly – the last thing you want to do is snap a bolt or even worse have something come loose on that 15 mile loop you’re hitting.
On the trail the R1’s have a similar feel to the ONE’s which I’ve been rocking on my DH bike. The modulation on these brakes is second to none. The R1’s don’t engage like on/off switches; rather they come in with an amount of stopping force proportionate to the lever pressure. I only use one finger to grab the levers and that is more than enough with these brakes. On descents or technical spots where I find myself dragging the brakes, the overall characteristics of the brakes didn’t change much due temperature increases on the rotor and pads.
The amount of braking force the R1’s generate is certainly less that its bigger brother the ONE but clearly the R1s sport a much more compact and lightweight package. These brakes release very quickly without a hint of drag which to me is a great thing. This is especially important for competitive riders where every second counts – the last thing you want is a system that slows you down when you don’t want it to. Valuable energy can be lost when brakes drag and fortunately the R1s don’t.
If you go back and read my review of Formula’s the ONE you can see that both sets are very similar in performance aside from overall braking force. Pricing is also similar with the R1’s landing at $330.90 MSRP. These are incredible brakes for XC and AM use and you’ll have a hard time finding higher performance in a mountain bike brake package anywhere close to this weight and build quality.
 Although it’s not shown here, Formula does offer the direct mount MiXmaster for your XX/XO/X9 shifters, both left and right side to clean up your bars a bit. They can be had for about $33.60 each; carbon levers and titanium bolt kits are offered as well.
Take a look at the Formula website for further details. Shout out to the good folks at Formula for providing the R1 brakes for review!


8 Comments
Nov 15, 2010
Nov 15, 2010
Thanks!
Luis
Nov 15, 2010
Firstly remove the wheel and if you can get in there give it a cleaning around the pistons (remove the pads).
Once you have the piston clean with the use of a brake cleaning spray such as the Motorex brake clean or the Finishline speed degreaser.
Grab yourself now a piston retraction device like the one that is supplied from Formula or if your careful a larger slotted screwdriver cycle the brakes back and forth that will lube the seals. That will make for smoother retraction and extension of the pads. now push in both pads all the way. Install the pads.
Now loosen the two caliper bolts that hold it in place.
Now apply the brake and have it squeeze the rotor...
Alternate and tighten the bolts again..What that does is center the caliper...You should be set.
Cheers
Nov 15, 2010
Have you heard of Muc-Off, it's a British brand that can be found in the country, they have a disc brake cleaner, with all the attributes of these other two, no residue, etc; but they indicate to leave the pads in, weird, wonder if you heard of it and can tell me about it.
I'll go look for the Finish Line first and let you know if it finally remove the problem. If I don't find neither one, can I use a car brake cleaner? I read last night that they may destroy the paint and plastic.
Thank you very much for your help, it's heavily appreciated 24hrs before the big show!
Nov 15, 2010
Any tips on how to improve this? What am I doing wrong?n Too much oil? The rotors are perfectly straight, it's just that the inner piston does not retract, no matter how much I've cleaned it with rubbing alcohol, even oil! Nothing, minimal movement, constant dragging.
HELP!
Mar 3, 2011
Aug 18, 2010
Sep 28, 2010