Pretty much the biggest upgrade you can give your mountain bike is a new fork but the installation can seem daunting even to experienced MTB tinkerers. If you’ve been considering a fork upgrade but aren’t sure where to start, you’re in luck: here is the step by step procedure that nearly all shops will use to successfully replace your MTB fork. Once you get good at the procedure you could easily do this task in about 35 minutes but for the first time, allot yourself a good hour and a bit. No need to rush this job -the more care you take the better results you will have.
Read your manufacturer’s instructions
The very first thing anyone should do is read the installation instructions. I don’t care if you are an experienced mechanic or a bike tech, there is always something in there that you may not have know or forgotten, and funny thing it is usually the most important piece of information that you need.
Gathering all the Tools
To do this job you need to round up a few items and tools:
Bike stand
Shop rags (to clean up remove excessive grease)
Allen sockets 3, 4, 5, 6mm (for use with your torque wrench)
Allen keys 3, 4, 5, 6mm
Side cutter (for removing old tie straps)
Soft face hammer
Chisel / standard screwdriver or crown race puller (Park tool #CRP-1)
Tape measure or ruler
Hack saw
Half round file with holder
Pipe cutter with new blade
Threadless saw guide (Park tool #SG-6 or similar)
Threadless nut installer (Park tool #TNS-1 or similar)
Tube that will fit over the steering tube and install the lower crown race
Torque wrench
Shock pump (high pressure up to 250psi)
You may need a new brake adapter if you are changing a fork that had IS (International Standard) mounts to one with post mounts but if your forks use the same mounting system you won’t need an adapter.
Warnings
This is IMPORTANT: If you do not feel you can do this, then don’t. Steering tubes are generally not replaceable so if you cut yours too short, then you’re outta luck. As always, MEASURE TWICE, CUT ONCE! When in doubt, read the last sentence again. When cutting you should wear safety glasses and you should never use a file without a handle. Be careful not to nick the side of the steering tube with any sharp object.
Removing front wheel and top cap
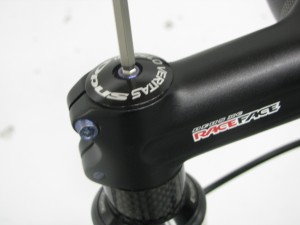
The very first step is to remove the front wheel. Next, release the top cap, take it off, and put it aside in a container so you don’t loose the bolt and cap.
Removing the front brake
Most bikes today use post mount brakes and in this case, it’s a simple matter of removing the two bolts that secure the caliper onto the fork. If you have an IS adapter, (International Standard) remove the brake from that point. Make sure all the hardware is placed in a small plastic bag (these use different bolts and should be kept separate).
Removing Brake Hose
Most bikes have the brake hose attached to it in one of two ways: a small plastic mount or a plastic tie wrap. If your fork uses a tie wrap, carefully cut it off, avoiding touching your brake line. Otherwise, simply remove the hex bolt that holds the clip in place and move the brake hose and caliper away. Under no circumstances should you be removing the brake line from the caliper.
Removing Stem Assembly
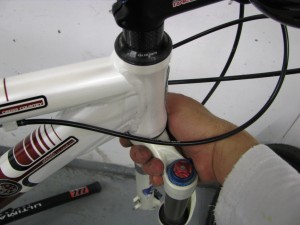
Use the series of photos below for the following instructions.
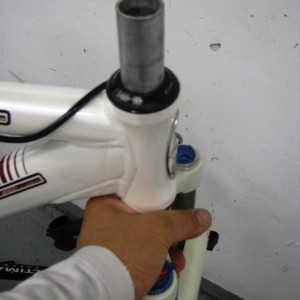
With one hand on the lower crown, hold the fork in position while loosening the stem bolts. The moment the bolts are loosened the fork will fall so better to be safe than sorry! Once you have released the bolts enough, remove the stem and bar as an assembly and allow it to sit on one side of the bike. Afterward, remove the spacers and top crown race and place them somewhere safe.
Remove fork
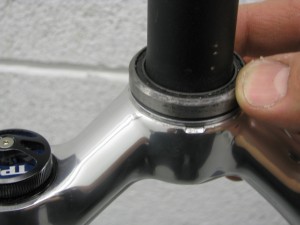
Once you have removed the fork you’ll find the lower bearing race and seal which you’ll need to remove so pay attention to the orientation of the bearing. Your bearing may not look like the one in the picture (this is what is called a cartridge bearing) but bearings won’t stray too far from this design. Keep in mind cartridge bearings are packed with grease so check to see how smooth they are moving (twist them and feel for grittiness, the smoother the better). If your bearings are rough you may want to consider a new headset at this time.
Remove lower crown race
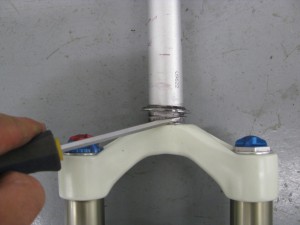
If you plan on reusing your old headset you’ll need to remove the lower race; otherwise, skip this step. There are a two ways that you can remove the lower race: use Park Tools CRP-1 OR if you are careful enough you can use a sharp chisel or a screw driver and gently tap the race off by working around ring, removing it evenly. Just be careful not to hit the steering tube! Wedge the tool between the fork crown and race, prying it upward until it pops off. Once off, put the race with the other parts of the headset.
Measuring Steering Tube Length
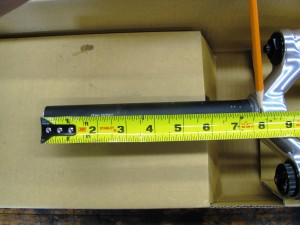 Measure the existing steering tube from the mounting face of the crown to the end of the steering tube (you may want to record that number). Next mark the new steering tube with a felt marker.
If you’re placing a new headset and it is not the same as the one that came off, you’ll need to use another method to figure out the steering length. To do that, first measure the head tube of the bike, then check the manufacturer’s info for the stack height of the headset plus the spacers and the thickness of the stem. Add it all up and with that total number subtract 2mm and that should be the length that you need to cut.
Head tube length +
Headset stack height +
Spacer stack +
Stem thickness +
Subtract 2mm from that total (this is for the top cap clearance and space required to preload the bearings).
Mark and cut the fork
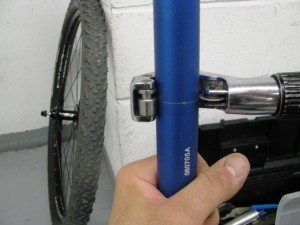 With the correct length marked on your fork you now have two options for cutting the fork. The first method is to use a threadless saw guide and a hack saw. Set your guide so that when the blade draws over your mark it sits just above the cut line – this ensures that the tube extension doesn’t get cut to short. Ease up on the last few strokes before cutting through – this will prevent a large burr from forming at the end that will have to be filed clean. Finally, carefully remove the saw marks off the top and file the edge at a 45 degree angle to ensure there is no burr or edge that can scratch you or components on installation.
The second method involves the use of a pipe cutter with a fresh blade (shown above). Just make sure to line up your pipe cutter just above the cut line and rotate evenly to get a clean cut.
Installing the star nut
 This step really is really best accomplished using a star nut setting tool, though you could try to install it by other means (you will have a very hard time doing so). Screw the star nut onto the nut setting tool all the way, then line up the star nut with the steering tube (do your best at lining things up here otherwise you will have issues later). Tap the star nut in to place and make sure you set it in a minimum of 5mm. Some tools have a stop that will set the nut in the right way every time.
Install the lower bearing race
Once the star nut is installed it’s time to install the lower bearing race. You can go and purchase the correct tool from a tool manufacturer such as Park or find yourself a tube that fits over the steering tube. I fashioned the tube shown here myself and included a small nylon ring to protect the bearing race. Carefully tap the bearing ring in place and make sure the race sits squarely on the fork crown.
Install fork
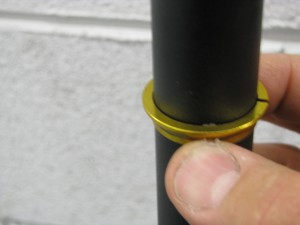
Once the lower bearing race is installed you can go ahead and replace the fork. Remember to replace the lower bearing and seal, then install the fork. Next, install the upper bearing, keeping in mind the orientation of the bearing, then install the compression ring (make sure flat side up) and the top cover. If you plan on using spacers below the stem, install them now followed by the stem itself. You should end up with 2- 3mm of space. Finally you can replace the top cap and stem bolt. Do not torque anything yet.
Install the front brake and cable
At this point you should be ready to install the front brake. When you have the brake loosely installed, make sure you’re using the correct bolt length (there should be 8 threads exposed past the caliper). Replace the front wheel with disk, being careful not to jam your rotor into the pads. Once the front wheel is correctly installed now you can set the caliper in place. The way I usually set up the brake is to slowly compress the brake lever, keeping the caliper as centered as possible when applying brake pressure. Slowly tighten the bolts down. Release the brake and spin the wheel while listening to make sure that the pads are not contacting the rotor. You may need to re-adjust the brake by loosening the bolts slightly and carefully moving the caliper until you don’t hear it rubbing when spinning the wheel. DO NOT stick your fingers near the rotor while in motion.
Once you are satisfied with the performance of the front brake, apply brake pressure again and torque the caliper bolts to the amount recommended by both the brake and fork manufacturers. If the fork you are installing states a lower torque value, use that one. The final job is to keep the cable from rubbing on any moving parts. Some forks come with a convenient mounting point, others require a tie wrap.
Now it’s finally time to line up the wheel with the stem and bars. Stand in front of your bike and hold the wheel between your legs. With your hands grab the bars and wiggle them side to side, slowly centering the bars. Once set you can tighten the stem bolts a bit.
Now, double check to see if the bar is straight. Grab the front brake and rock the bike fore and aft while listening and feeling for a light clunk. If the front clunks you may have insufficient pre-load on the stem top cap in which case you’ll need to loosen the two stem bolts slightly and give the top cap bolt a half turn. Keep doing this until the clunk disappears. If the steering suddenly gets too stiff, you went too far on the top cap tension. Once you have the correct tension, line it up and now torque the stem bolts (use the correct torque from the stem manufacturer).
Now – you’re done! You did it!
Cheers.
Just a quick thanks to the folks at Manitou,Hayes and Opus for their support.







10 Comments
Sep 2, 2009
Jun 22, 2009
Jun 22, 2009
Sep 3, 2009
Jun 22, 2009
Cheers
Nov 10, 2011
Apr 20, 2010
Jun 30, 2009
Jun 23, 2009
Jun 29, 2009