Having used and loved previous versions of the Cane Creek Double Barrel line of shocks, I was super stoked to test out the new DBInline, especially because I wasn’t happy with the stock tune on my Bronson. The factory-supplied shock wasn’t up to my expectations, and I knew from previous reviews that a Cane Creek would be the perfect solution. I was all over the DBInline after it was introduced, with high expectations.

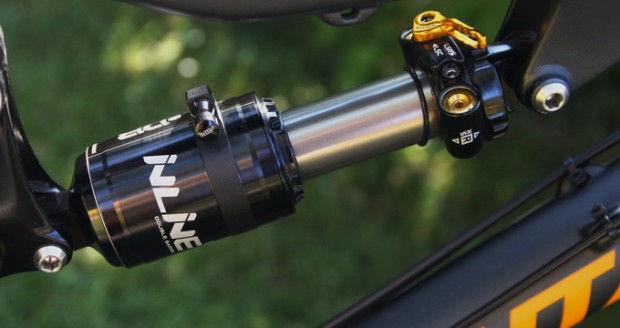
The new DBInline shares the same patent-pending technology of the other Twin-Tube series shocks. Unlike previous versions of the DB shocks, the DBInline has been cut down in size to save on weight and packaging. To do this, a complete overhaul was necessary to figure out a way to remove the external reservoir. In its place, a smartly-placed membrane with a gas charge is now located above the adjusters.

Cane Creek discovered that the membrane was all that was needed for shorter-travel rear shocks. With this new design, shorter-travel bikes don’t have to deal with the added grams that a reservoir tacks on.
Below is a graphic representation of how the rebound and compression circuits work with and without the climb switch. In all cases, you can see the suspension fluid flowing fully from the inside tube through the dampening circuits, then back out to the outside tube.
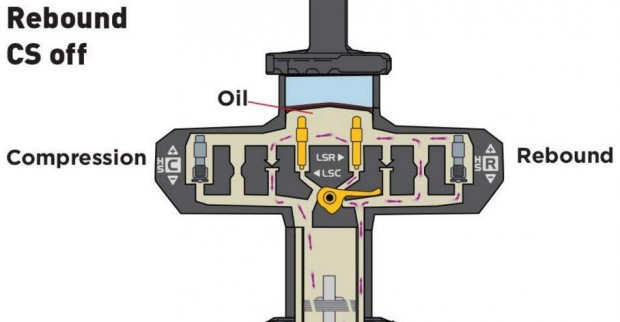

In rebound, fluid flows from the back side of the piston, to the outside tube, then through the dampening circuits, and back to the top side of the piston. In compression, flow is reversed. In both cases the membrane takes up any surge of fluid, preventing cavitation.


Don’t let the name fool you: the DBInline isn’t a stripped-down version of a DBAir. Not in the least. You still get the Twin-Tube design that the DB series shocks are famous for. However, a slight change in the placement of the circuits was necessary, compared to the DBAir and DBcoil. No matter which way you look at it, you still get the same four-way independent adjustments. The only difference is that this time around they are individually spaced with their own separate dials.
For the shorter-travel bikes that do spend considerable time going both up and down, an easy-to-use climb switch that sits around the LSC dial makes changing rates easy. Simply called the “Climb Switch technology”, like the DBair with CS it engages a separate set of low speed compression and rebound circuits, which increase pedaling efficiency. For more information on the Climb Switch be sure to check out this previous article.
Installation and Setup
Installation of the DbInline is remarkably easy on a Santa Cruz Bronson. A 6mm hex key is all you need. If you’re purchasing the DBInline aftermarket, you will need new hardware as the shock doesn’t come with it. Depending on what bike you ride, you will need to order a few new kits. Installation of the hardware takes just a few minutes, and it can be pressed in by hand. I say go with new hardware versus trying to make do with what you already have: you will get longer life out of the deal. Cane Creek, or any other 1/2″ standard hardware, will cost another $20 or so per side.
Slide the shock in place and loosely screw in both sides of the shock first, before torquing it down. That way you can avoid cross threading a bolt into your frame. Once both sides are in, torque the bolts to the factory-recommended torque values using a torque wrench. “Good enough” is just not good enough: replacing a frame due to a damaged thread is a terrible way to spend your hard-earned dollars.
With the hardware installed, setting up the rear shock is just a matter of following the supplied tuning guide. The shock comes already setup with factory settings. I went with them for a little while to feel things out.
- LSC 7 clicks
- HSC 2 turns
- LSR 18 clicks
- HSR 2 turns
- No air volume spacers
With many rides along the Don trails and Albion Hill trails, I found that I was hard-pressed to really nail down any changes I needed to make to these settings. But being a rider who likes things a bit more compliant in the beginning of the stoke with it ramping up faster later in the stroke, I ended up with these settings:
- LSC 7
- HSC 1 1/2 turn
- LSR 11
- HSR 2
- 1 air volume spacer.
This setup allows for a sensitive rear end, but when things get a bit rougher, the spacer in the air can ups the spring rate mid to end stroke.
Out on the Trail
Performance is what Cane Creek is all about. The new DBInline is light years ahead of what came stock on the bike!
I found that I rarely needed to use the Climb Switch. When I did need it, it was mostly on the longer climbs. The added dampening was very welcome, especially when my legs were feeling like jelly.
As far as pointing the bike down and going fast, there is nothing better (to date) for a shock without a reservoir. I really prefer the ability to tune the shock my way, and not what some other person or focus group wants. Once the DBinline was set to my liking, I found the ride to be much more satisfying. There was no compromise in ride quaility due to being limited to a choice of one of three settings.
It didn’t matter if I was aggressively pedaling along fast, hard singletrack or plowing through rocks and roots: the bike behaved amazingly well. The rear end never packed down once or tried to toss me over the bars when trying to unload itself.
At only $495 MSRP you’re getting all the goodness of the DBair CS, but for $200 dollars less! The only downside to the DBInline is the number of sizes available. The shortest comes in at 6.5 x 1.5″ and the longest is 8.5 x 2.48″, covering many bikes, but one or two may be left out. However, you can easily go online and check out the fit finder to see if the DBInline will work on your bike. And if it will… I can’t recommend it enough!
Thanks to Cane Creek for providing the DBInline for review!







0 Comments