


This is the third and final installment in our series on spring mountain bike maintenance. You can read Part 2: Drive Train, Frame, and Brake Maintenancehere.
Headset Maintenance

After a year of riding in the muck and dust you will be surprised at how much abuse your headset takes. It is always a good idea to service it and clean the thing up. In the case of the Yeti, it had water contamination on the lower race.
Clean up the installed race cups from any debris, as well as the head tube. You do not want any contamination here to get caught between a bearing and cup (otherwise you will notice that annoying creaking sound). Once the headtube and cups are cleaned, clean the fork’s steering tube and lower race.
Now set the parts aside and concentrate on each of the races, one at a time. Turn them to ensure they still feel somewhat smooth. If either one feels like it has an index to it, you’re going to have to replace it because pitting has occurred. If it just feels rough, you can follow the same procedure outlined earlier on how to lube a sealed bearing. On headsets, like the other bearings, a good-quality grease that doesn’t wash out easily is paramount.

Once satisfied with the condition of the bearings, reinstall them (using that photo you took earlier if you need a reminder). With the dual crown on the Fox 40, we used the pad spreader adapters to carefully pry the clamps away a bit to ease installation.
At this time I run the brake hoses around the frame set.Preload the headset, first making sure there is no play in the fork. Do not torque the upper crown at this time. I leave that until last when the wheels are back on the bike.
Handlebar Reinstallation, Brake Lines, Cables, and Housing

Reinstall the handlebar as an assembly–hopefully you didn’t take things apart. Torque the stem to the upper crown (usually 6-8Nm).
Now run the brake hoses the rest of the way to the rear of the bike and along the fork. Loosely use tie wraps on the frame bosses to help your progress.
I held off on the shifter cable housing simply because this item should be exchanged. If you do intend on keeping it, replace the cable. A new cable really keeps things shifting great. So run the housing to the rear derailleur, making sure you copy the path set by the manufacturer. Make sure you don’t have any sharp bends or leave the cable too short as suspension travel tends to lengthen the amount of cable needed.
When replacing the cable, use a quality cutter like the Park CN-10 tool. A proper tool like the Park will cut the cable to a nice square finish. After the cable is cut, use a straight pick to ensure that the housing is perfectly round. That will eliminate a lot of the drag that is generated from the system.
On the Yeti there is no front derailleur so we only did the rear shifter. Seeing that none of the settings were disturbed, we just adjusted the tension afterwards.
(For more information on adjusting shifting be sure to read this article.)
Wheel Maintenance

Now, it’s time to the service the wheels. If you have a truing stand you can now check out the condition of the wheels easily enough.If you don’t have a truing stand it might be a good time to visit the LBS and have them take care of the wheels.
One thing everyonecan do is check the condition of the cassette body and bearings. Turn the wheel axle and get a feel for the wheel. If it feels smooth you should be fine. If, on the other hand, a bearing feels rough, the bearings are in need of replacement (cartridge) or service (Shimano-type free ball). I personally have had limited luck with opening up cartridge hub bearings, and have found that the little cost involved in buying new bearings outweighs the hassle of service. So if the bearings are rough, order up a new set. The manufacturer of your wheel should have info on their website on how to replace a bearing, so check that out too.
The Yeti had no issues with the wheels, so cleaning the cassette body was all that was needed. After the wheels were true and clean, we reinstalled them
(For more information on how to true a wheel, be sure to read this tutorial.)
Finishing it Off
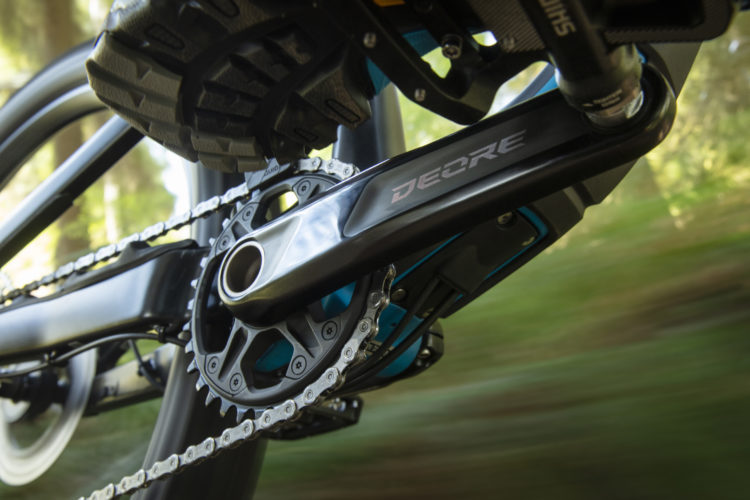
Now with the wheels back on the bike, reinstall the crank and the chain. After that, bolt the front and rear brakes back on and adjust them.
The last job is to put the bike on the ground (on its wheels) and tension the preload and steering properly. Using the top cap bolt, apply enough torque on the bolt to stop the steering from rattling when you drop the front end to the ground or apply the front brake and rock the bike back and forth, but not too much torque to make the steering feel stiff. Once you’re happy, tighten the three top bolts that secure the stanchion tubes and the upper crown to the steering tube. Do a quick road test to check shifting and braking, and all is done.
Now get out there and shred!


0 Comments